Get started with Automations
Learn everything that you need to know in order to get started with Automations.
Table of contents
🎬 Video tutorial
1. Locate your automations
To access your automations, navigate in the left side bar of your 1Home Server dashboard to Automations tab. Here you will see a list of all of your automations.
You will also be able to see the run history of your automations. Learn more about Run History.

2. Create automation
To start creating your first automation, click + Add button and provide automation name and description (optional).

3. Edit automation
After you click Save, you will be able to start creating your automation.
To start with you will be presented with an automation that only includes one un-configured trigger.

There are many automation blocks that you can use to build your automation. We suggest that you learn more about each of them here:
- When - They start the automations
- Actions - Perform actions in your system
- Conditions - Perform checks and validate conditions
- Wait - Wait within the automation
- Adding and linking automation blocks - Adding and connecting blocks with each other
Anywhere in the system you can also use Dynamic Data, which enables you to do simple math, access states of your devices, system time and values from previous blocks.
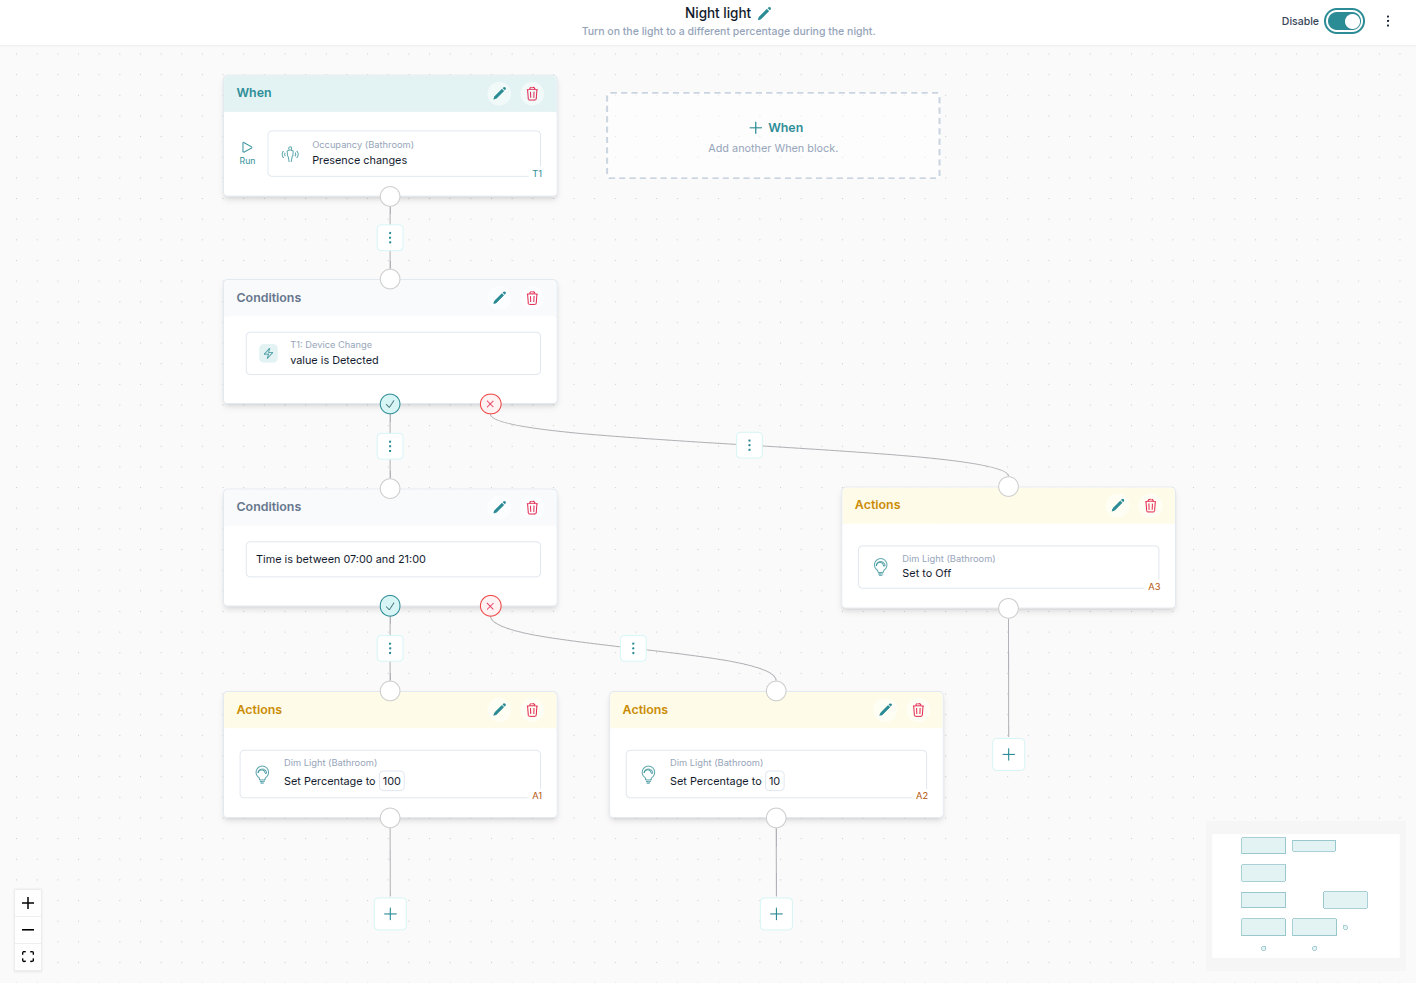
Sample automation: Night light
In the image below we have created an automation that reacts to the changes of the Bathroom occupancy sensor and turns on the light to a different percentage during the day or night. In case the sensor stops detecting movement, the light is turned off.
We suggest that you watch the video at the start of this guide to see a step by step tutorial on how to create an automation.

Want to try it out? Download this automation from the Automation templates.
Reusing automation
You can easily reuse this automation in other rooms in just a couple of clicks by simply Duplicating it and using a Quick device replace function. Learn how to do that.
4. Enable automation
After you are satisfied with your automation you can enabled it in the top right corner.

Voila! Now the automation is running.
5. View run history
You can see the history of automation runs in the Run History tab as shown in the image below.
This way you always know what is going on in your system and when.

6. Backup your system
It is always good to have a backup of your configuration.
With 1Home Server, this is very simple. See how to back up your 1Home Server configuration.
Next steps
Now that you know the basics you can learn how to get the most out of Automations by digging into different guides below.
- Automation blocks
- When - Trigger automations
- Actions - Perform actions in your system
- Conditions - Perform checks and validate conditions
- Wait - Wait within the automation
- Using dynamic data - Access any device in the system, do maths and more
- Adding and linking blocks - Connect blocks with each other
- Test automation - Test run an automation.
- Run history - Always know what is going on in your system, which automations are running and if they have ran successfully
- Reuse automations - Reuse automations within the same project or within different projects
- Backups - Backup all of your automations
- Working with KNX - How to interact directly with your KNX system
- Examples
- Automation templates - Use templates provided by 1Home