Want to easily group your smart devices with your assistant? See the options for integrating them into Loxone or KNX: https://www.1home.io/
Controlling single devices is time-consuming, boring and ultimately, unnecessary. This is where Groups come very handy (Siri and Google call these groups Rooms).
Groups enable you to arrange devices into groups and control them as a single entity.
With your smart home devices associated with specific rooms, the assistant will let you accomplish more with fewer words. Rather than commanding “Turn off living room light 1, turn off living room light 2, turn off living room light 3.” you name the room Living Room and then say “Turn off living room lights.” to turn everything off at once.
Better yet, if the assistant you are speaking to is in the same room as your smart lights, then you can add it to the same group as the lights. Then all you have to say is “Lights off” and the assistant will understand the association and turn off the correct lights.

While groups offer much simpler control in comparison to single devices - they can not match your daily rituals. This is where Routines come into play.
How to create Groups
How to create a Group in the Alexa App
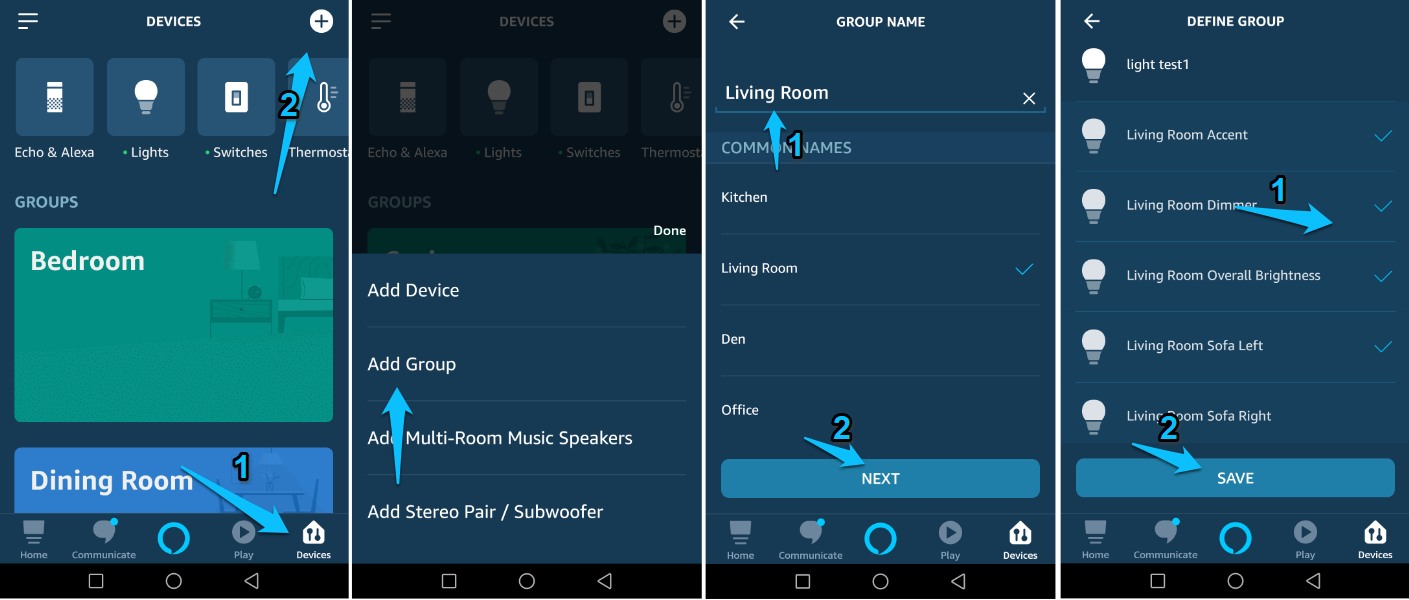
- Open the Alexa mobile app.
- Please select the “Devices” icon in the bottom right corner.
- Click the (+) plus sign in the top right corner and select “Add group”.
- Choose which devices you would like to add (blinds, thermostats, switches, lights, spots) and tap “Save”.
- Please note: You can also add your Echo as a device - this way you can control the room without using its name (Alexa, turn the lights off -> as opposed to Alexa, turn the Living room lights off)
- Select the name from a set of predefined names or chose your own custom name. Tap “Next”.
- The new group will appear in your Groups section.
Good job! You have just created your first group!
Now you can use commands like:
“Alexa turn on the Living Room.”
“Make the Living Room warmer/colder.”
“Dim the Living Room.”
How to create a Room in the Google Home app
The first time you connect your Google Home smart speaker in the mobile app, the wizard invites you to set-up your devices and assign them to Rooms.
- Please select which lights, switches, blinds or other devices you would like to add to the Rooms.
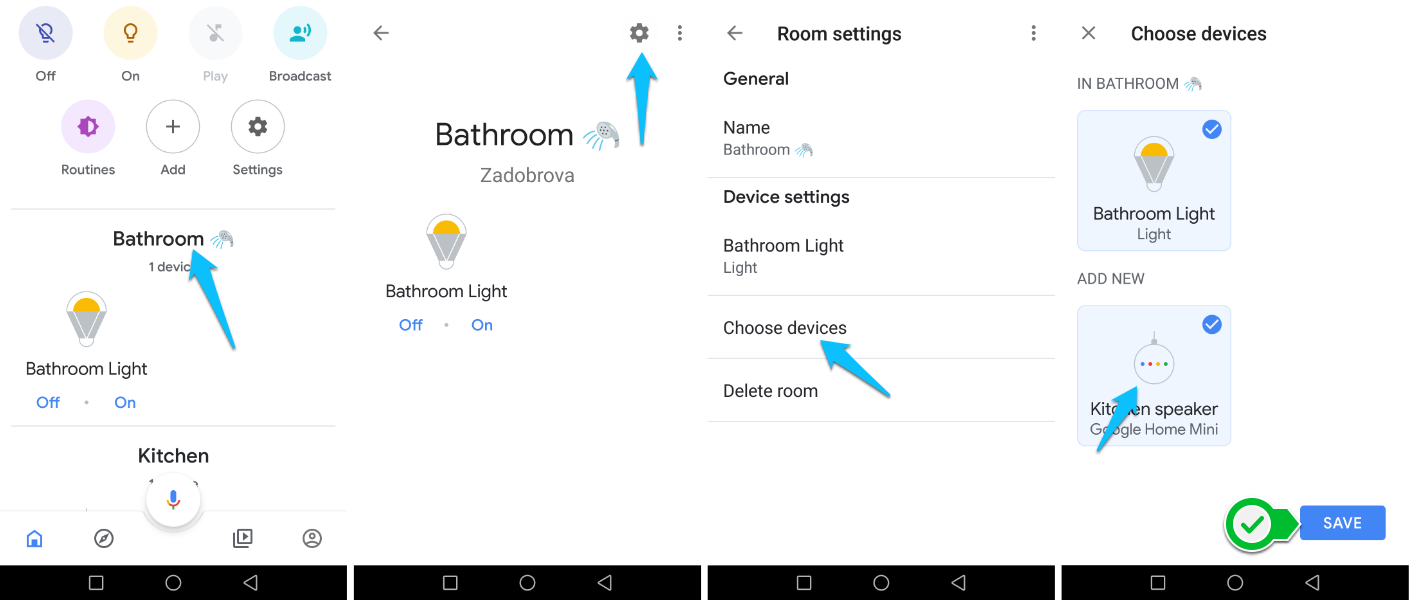
While adding devices to rooms, why not add your Google Home device to one of them also?
This way, you don’t have to use the Room name, only the command. A Google Home device in that room will understand that you’re speaking to it.
You can move just one of the devices to a different room by tapping on the specific device:
- For example tap the “bathroom light”.
- Select the “Settings” icon.
- Tap “Room” to choose a different room or create a new one.
How to create a Room in the HomeKit app
With Siri you can not only define Rooms, but also group them together into zones, like upstairs or downstairs. To start, please open the “Home” app on your iDevice.
If you are connecting HomeKit with 1Home for the first time, you can add devices to rooms during the onboarding wizard.
How to add a device to your Room:
- Tap and hold the device.
- Select Details.
- Under “Location” select the room which you would like to use or create a new one.
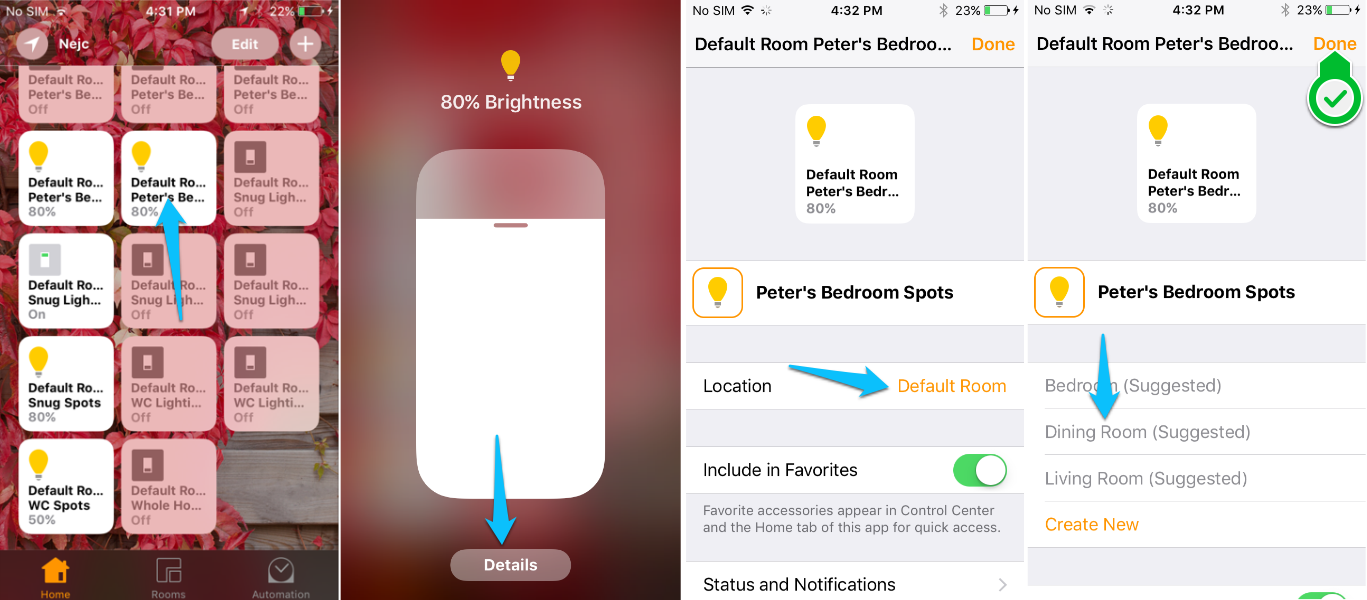
You can also create a Room with Siri/HomeKit separately:
- Tap the Rooms tab,
- Tap the menu icon in the upper-left corner, and select Room Settings.
- Tap Add Room.
- Choose a name for your room and tap Save.
Now it’s time to add some smart home devices to it, just follow the instructions mentioned above.
If you'd like to create a group that includes all of your Loxone, Gira or KNX devices, make sure to connect your Amazon Alexa or Google Home to them.
Learn how to connect your Alexa with a Loxone, Gira or KNX smart home.
If you own a Google Assistant, you can also connect it to a Loxone, Gira or KNX smart home.
As of recently, you can connect Apple HomeKit to your Loxone, Gira or KNX smart home.
Your new all-in-one KNX / Loxone Server.
